What Is a Moka Pot? Stovetop Espresso Brewing Explained
How the moka pot works, what pressure it uses, how it compares to espresso, grind size, heat settings, and the Bialetti Moka Express — from a former barista trainer.
Read Guide
Grind size, water temperature, heat control, and the exact moments that separate a bitter stovetop espresso from a genuinely great cup
I have made more cups of moka pot coffee than I can count — in training kitchens, at home, and testing equipment at client sites across the UK. And almost every time someone tells me their moka pot makes bitter, harsh coffee, the diagnosis is the same: too-fine grind, too-high heat, or they left it on the stove after the first gurgle.
The moka pot is not complicated, but it punishes inattention more than most brew methods. A pour over forgives a slightly too-coarse grind. An AeroPress is endlessly adjustable mid-brew. The moka pot asks you to get three things right before you turn on the heat, and then to pay attention for five minutes. Do that, and the result is deeply satisfying: strong, rich, chocolatey coffee with enough body to carry milk or stand alone.
This guide covers the full moka pot technique — grind size, water prep, heat management, stovetop differences, and how to diagnose whatever is going wrong with yours. If you want background on how the moka pot actually works and what it is, see our complete moka pot guide. If you are here to fix a specific problem, skip straight to the troubleshooting section. If you are considering buying the Bialetti Moka Express and want to know how it performs across both the 3-cup and 6-cup sizes — including head-to-head testing against a pump espresso machine — see our hands-on Bialetti Moka Express review.
| Grind Size | Heat & Timing | Water |
|---|---|---|
| Medium-fine (not espresso) | Medium-low heat throughout | Pre-boil for best results |
| Looks like fine sea salt | 4–7 min total brew time | Fill below safety valve |
| 2–3 clicks coarser than espresso | Remove at first gurgle | Never tamp the basket |
You do not need much. The moka pot is one of the most accessible brew methods precisely because the equipment list is short and most of it is durable.
This is the single variable I see get wrong most consistently, and it is responsible for the majority of bad moka pot results. The instinct is to grind fine — the pot looks like an espresso machine, so espresso-fine grind seems logical. It is not.
A moka pot only generates 1–2 bars of steam pressure — compared to 9 bars in an espresso machine. An espresso-fine grind creates a puck so dense that 1–2 bars cannot push water through it cleanly. The result is a slow, stuttering extraction where pressure backs up, the safety valve may release, and whatever does make it through is over-extracted and harsh.
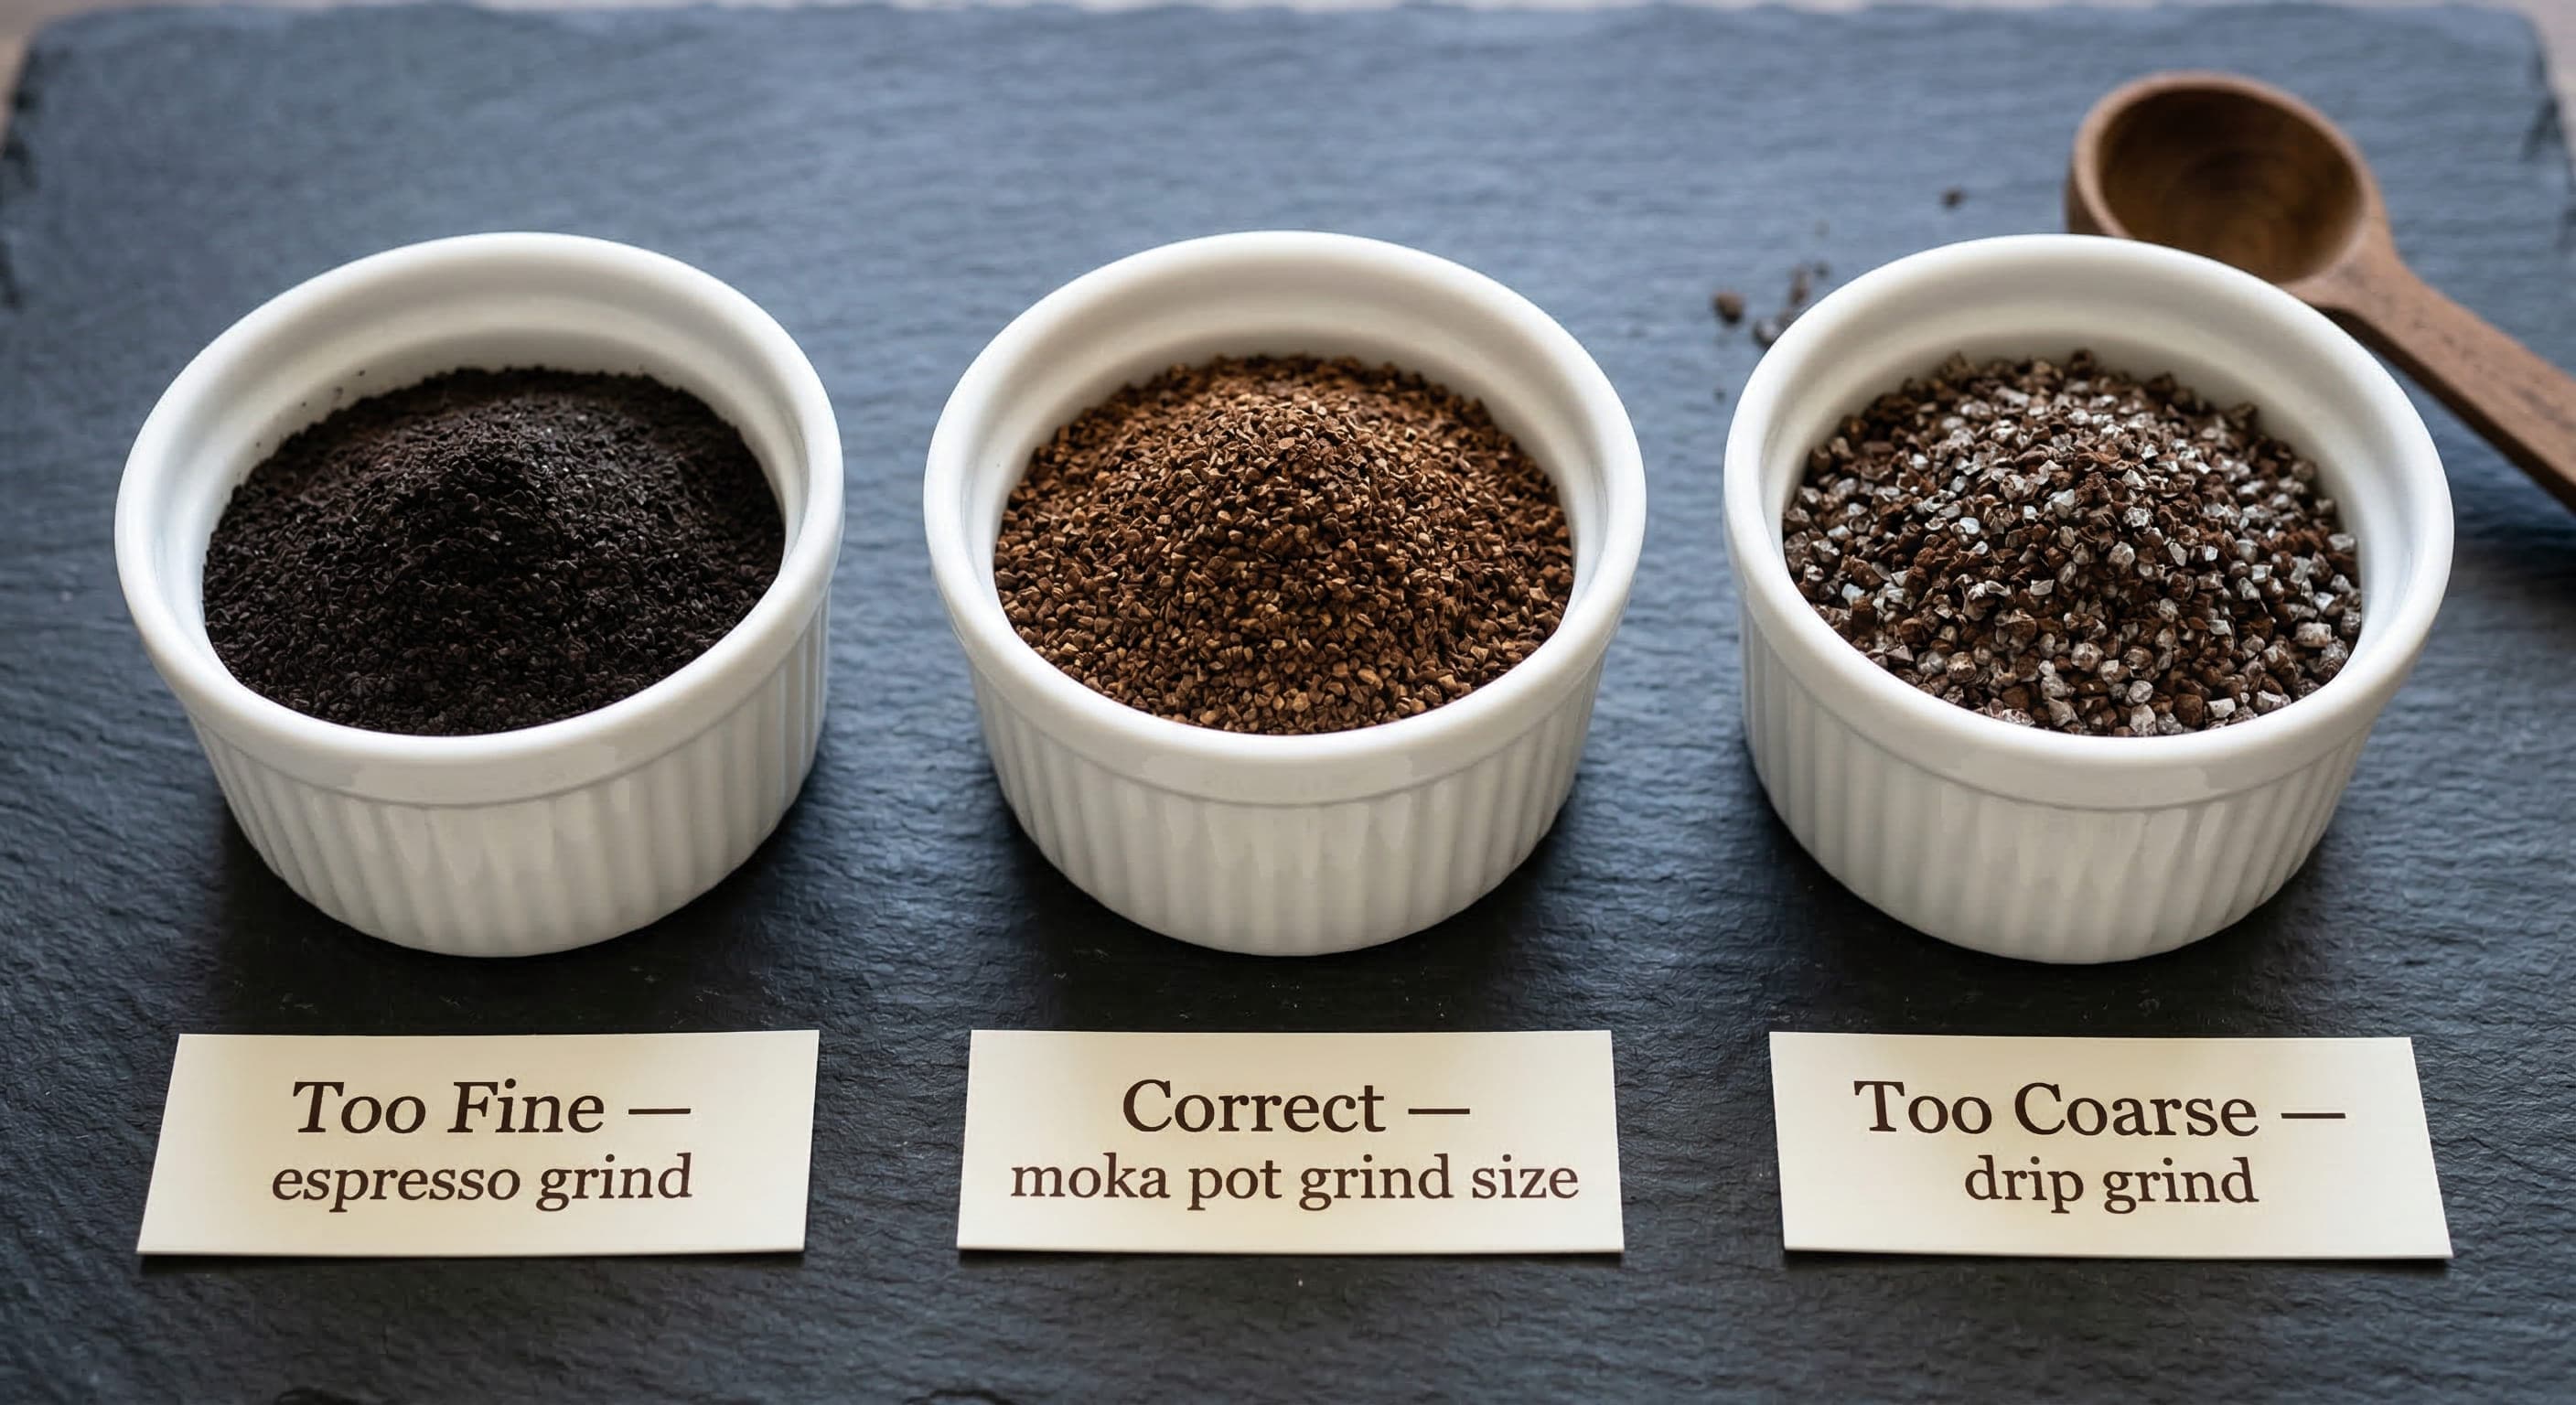
The correct target is medium-fine: coarser than espresso, finer than drip or pour over. Visually, it looks like fine sea salt — individual particles are visible, not a powder, but fine enough that the grind feels slightly tacky when rubbed between your fingers. On most consumer burr grinders, this sits 2–3 notches coarser than your espresso setting.

| Grind | Visual | Result | Fix |
|---|---|---|---|
| Too fine | Powder, no visible particles | Slow / clogged, very bitter | Go 2–3 notches coarser |
| Correct (medium-fine) | Fine sea salt, slightly tacky | Rich, bold, 4–7 min brew | Stay here |
| Too coarse | Table salt or coarser | Thin, watery, sour | Go 1–2 notches finer |
For exact grind numbers across brew methods, see our coffee grind size chart — it covers micron ranges and calibration steps for every brewing method including the moka pot.
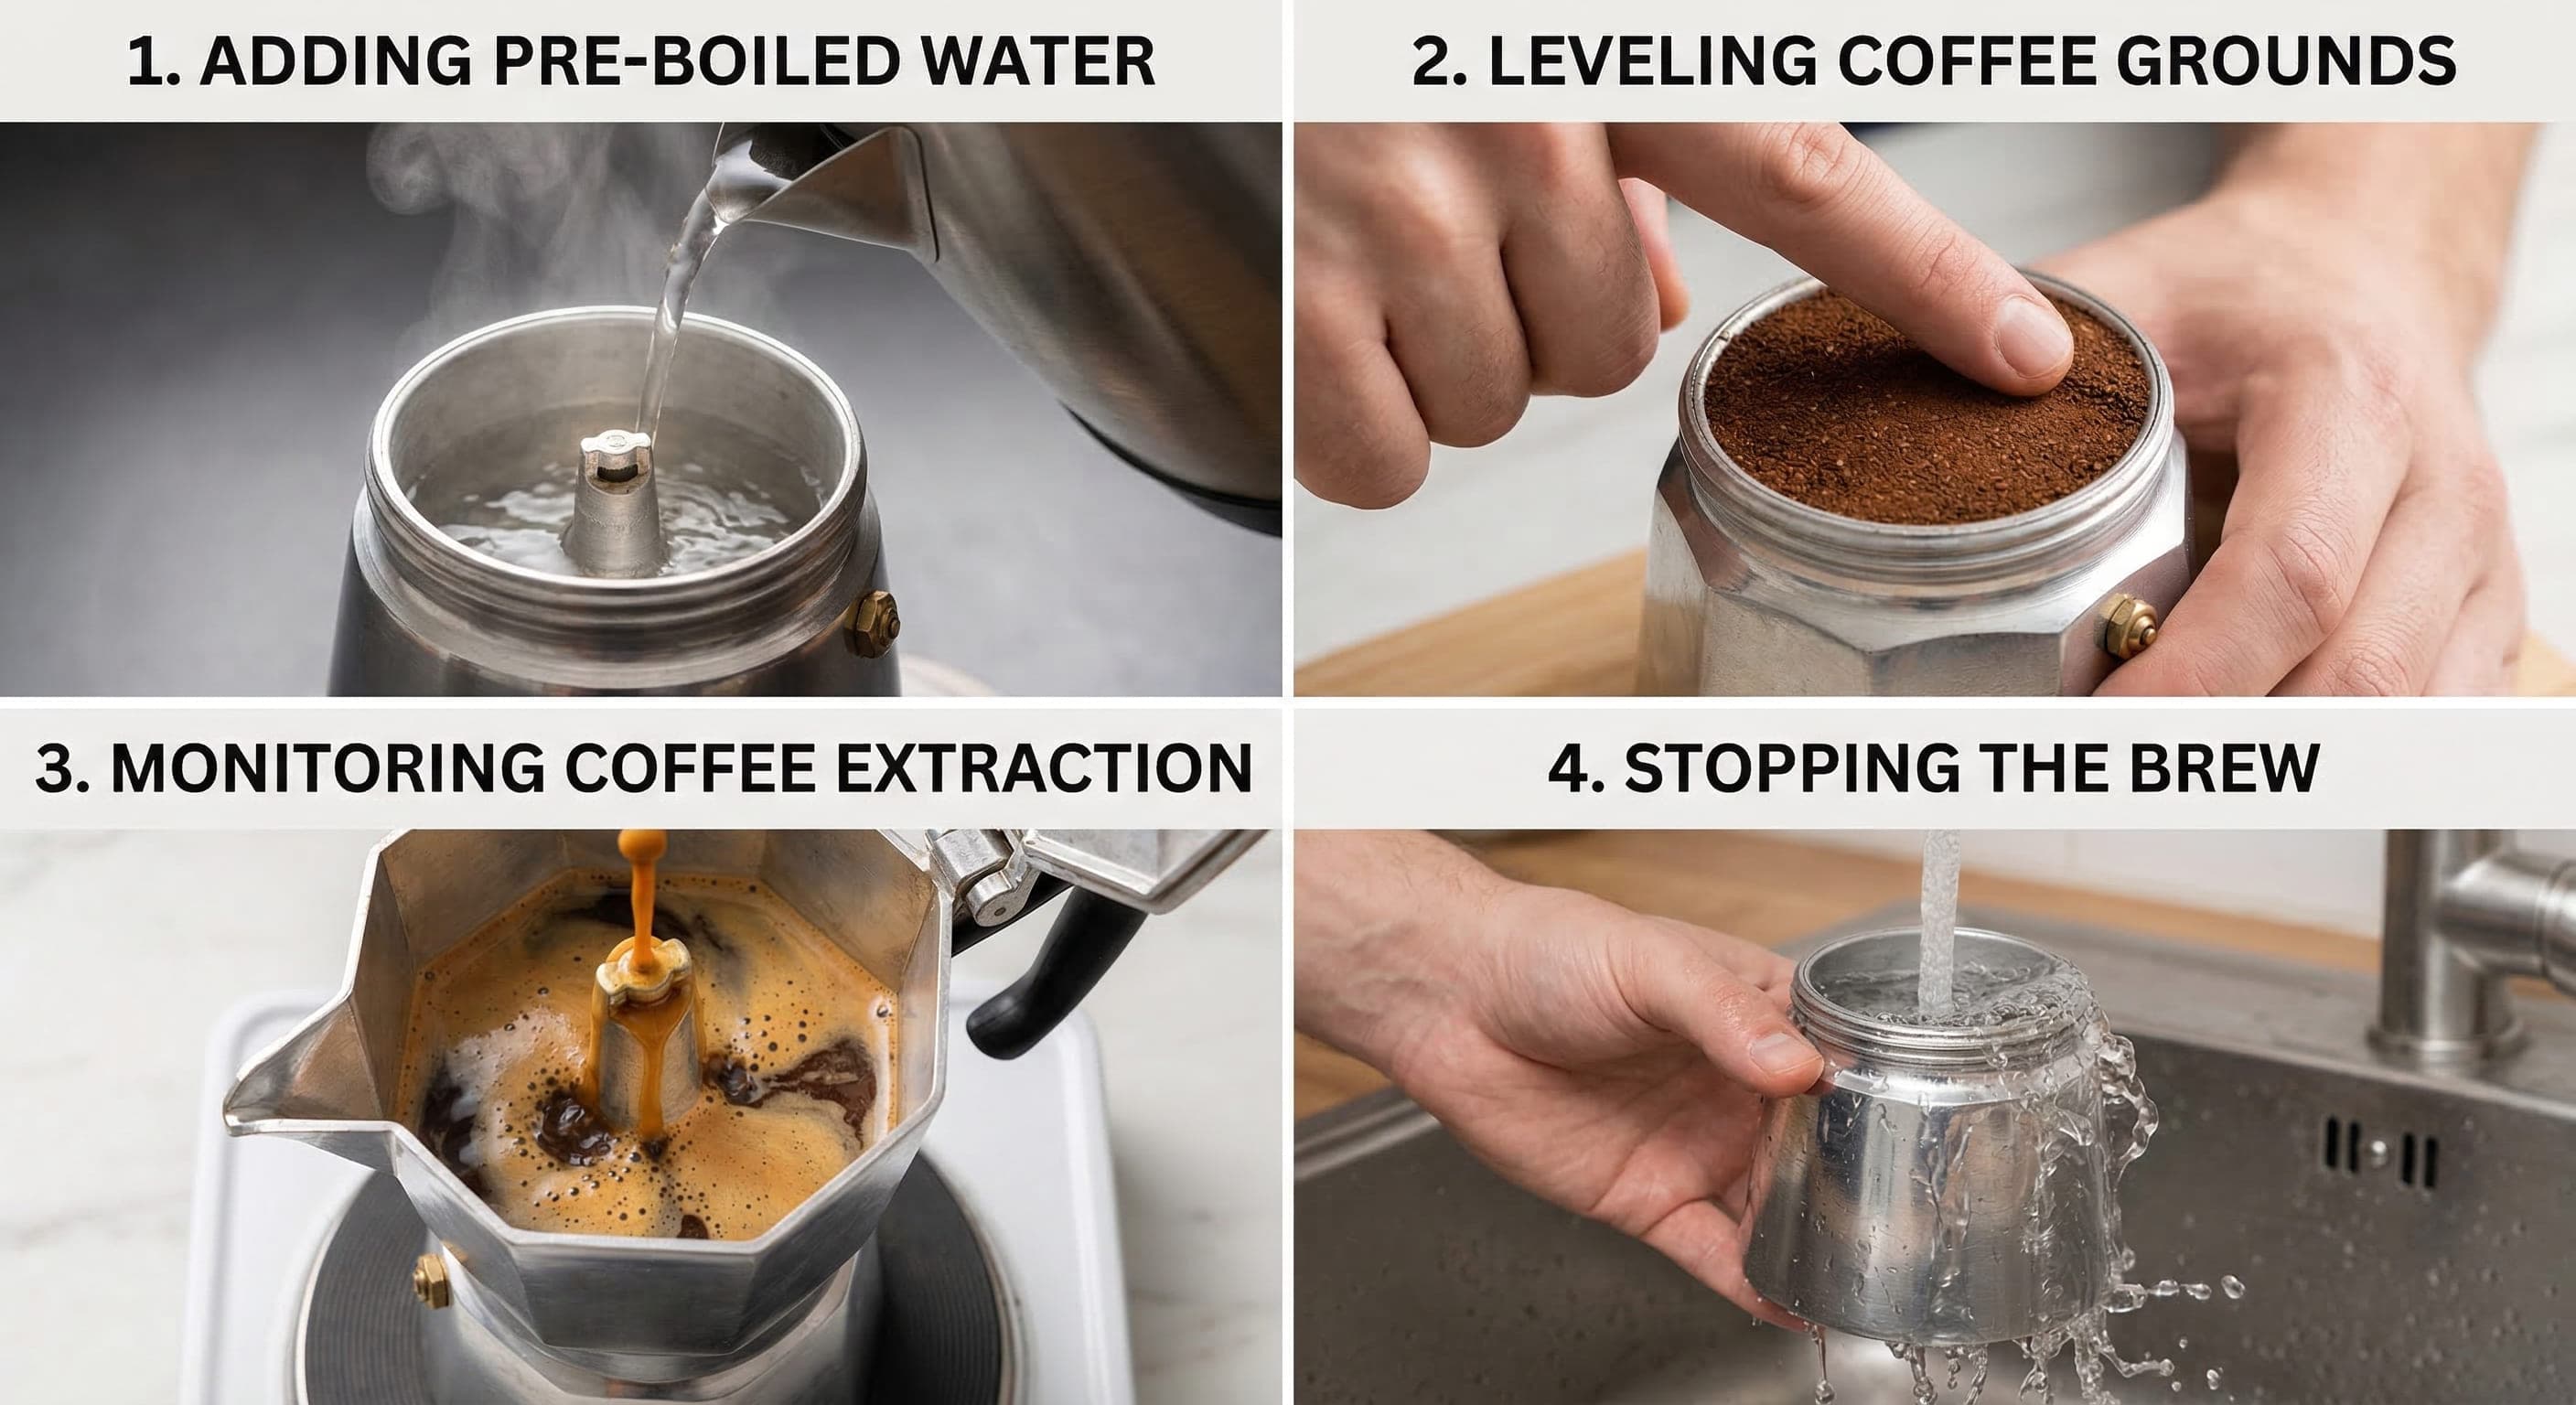
The following is the technique I use and teach. It incorporates the pre-boiled water method and the cold-stop finish — two steps that most basic instructions omit and that make a meaningful difference to the final cup.

After grind size, heat management is the thing that most separates a good moka pot cup from a bad one. High heat is the most common single cause of bitter, harsh moka pot coffee — and it is surprisingly counterintuitive because most people assume faster means better.
Here is what actually happens on high heat: the steam pressure in the lower chamber builds rapidly. Water is pushed through the grounds faster than it can absorb heat evenly. The extraction is rushed, uneven, and then the residual heat scorches the last portion of the brew. You end up with the worst of both worlds — under-extracted in places, scorched in others.
On medium-low heat, the pressure builds gradually and water moves through the grounds at a steady pace. The temperature at the point of extraction is more consistent. You get a cleaner, more even flavour — rich and strong without the metallic edge that comes from too-fast extraction.
The best moka pot cup I made in testing took 6 minutes on a barely-there gas flame with pre-boiled water. The worst took 90 seconds on maximum heat. The difference in the cup was startling.

The stovetop espresso instructions I described above work on any heat source, but the specifics vary enough to be worth covering separately. Having tested moka pot brewing across all three main hob types, here is what I have learned.
The most controllable option for moka pot brewing. Medium-low means the flame just kissing the bottom of the lower chamber — not licking up the sides. Gas responds instantly to adjustment, so you can fine-tune during the brew if needed. If the pot is larger than the burner, use a heat diffuser to spread the flame evenly under the base.
Setting: Flame tip touching base only. Brew time approximately 5–6 minutes with pre-boiled water.
Electric hobs are less responsive but perfectly workable. Set to 40–50% power — on a dial scaled 1–10, that is a 4 or 5. The main challenge is thermal lag: electric rings take time to cool down after you reduce heat, so the pre-boiled water method matters more here because you are spending less total time on the element.
Setting: 40–50% of maximum. Brew time approximately 5–7 minutes with pre-boiled water.
Compatibility first: the classic Bialetti Moka Express is aluminium and will not work on induction. You need a moka pot with a ferromagnetic (magnetic) base — hold a magnet to the bottom to test. Bialetti's stainless Moka Induction, the Brikka, or any stainless moka pot with a flat magnetic base will work. Induction is actually excellent for moka pot brewing because of precise temperature control — set to 600–800 W for a controlled brew.
Setting: 600–800 W (medium-low power level). Brew time approximately 4–6 minutes with pre-boiled water.
Unlike pour over or AeroPress, where you dial in your own ratio, the moka pot dictates its own ratio through its design. The basket volume and water chamber are sized to each other, and the correct technique is simply to fill both. That said, understanding what the numbers look like helps you choose the right size and know when something is off.
| Moka Pot Size | Coffee (g) | Output (ml) | Best For |
|---|---|---|---|
| 1-cup | ~7 g | ~40–50 ml | Solo small cup, espresso-style sip |
| 3-cup | ~15 g | ~120–150 ml | Solo or two small cups, most versatile |
| 6-cup | ~22–25 g | ~240–300 ml | Two to three people, or one large mug |
| 9-cup | ~35–40 g | ~360–450 ml | Three to four people or entertaining |
The most common sizing mistake is buying a 6-cup and trying to brew a 3-cup serving. It does not work — partial fills change the pressure dynamics and produce weak, under-extracted coffee. Buy the size that matches what you actually drink daily, and brew at full capacity every time.
Moka pot problems almost always trace back to grind size, heat, or timing. Here are the most common symptoms and their fixes, in order of how often I see them in practice.
Most likely cause: Grind too fine, heat too high, or left on the stove after the gurgle.
Fix: Go 2 notches coarser on your grinder. Reduce to medium-low heat. Remove the pot the instant gurgling starts and run the base under cold water. If you are using pre-ground supermarket espresso, switch to a coarser filter-grind coffee.
Most likely cause: Grind too coarse, basket not fully filled, or heat too low (brew took too long).
Fix: Go 1–2 notches finer. Always fill the basket to the rim. Slightly increase heat if brews are consistently taking more than 8 minutes.
Most likely cause: Grind far too fine, or basket overfilled and grounds blocking the filter holes.
Fix: Go significantly coarser (3–4 notches). Check that no grounds are sitting above the basket rim or lodged in the filter holes. Never tamp.
Most likely cause: Gasket worn or misaligned, causing uneven pressure build-up.
Fix: Check the gasket is seated correctly and has not folded or cracked. Rubber gaskets should be replaced every 12–18 months with regular use. Bialetti replacement gaskets are inexpensive and widely available.
Most likely cause: Stale beans. No technique can compensate for coffee past its prime.
Fix: Check the roast date on your beans. Coffee past 4–6 weeks from roast date produces flat, lifeless moka pot coffee regardless of technique. Fresh beans from a local roaster or a subscription that ships quickly make a significant difference.
For a broader look at why coffee tastes bitter across brewing methods and how to diagnose it, our guide on why coffee tastes bitter covers extraction, water temperature, and equipment issues in detail.

A properly made moka pot brew takes 4–7 minutes from cold start to pour — or 3–4 minutes if you use pre-boiled water in the lower chamber.
Brews that finish in under 2 minutes are almost certainly using too-high heat, which produces harsh, bitter coffee.
If yours consistently takes longer than 8 minutes on medium-low, your grind may be too fine or your heat too low.
How the moka pot works, what pressure it uses, how it compares to espresso, grind size, heat settings, and the Bialetti Moka Express — from a former barista trainer.
Read GuideDiscover the real reasons your coffee tastes bitter—over-extraction, grind size, water temperature, brew time, dirty equipment, and stale beans—plus step-by-step fixes for each cause.
Read GuideVisual grind size reference for every brew method — espresso through cold brew — with dialling-in tips and grinder setting guidance from a Q Grader specialist.
Read GuideExpert Tested
All guides written by SCA Level 2 certified professionals with 15+ years of hands-on testing.
Our testing methodology →Join our newsletter for expert reviews and brewing guides.